本文共 3133 字,大约阅读时间需要 10 分钟。

powerpoint预览

Perhaps you’ve just , and you want to delete a few and rearrange the others. Or maybe you’ve started from scratch and add new or reorganize existing slides. Whatever the reason, it’s quickly done in a few simple steps.
也许您刚刚 ,并且想要删除一些并重新排列其他 。 或者,也许您是从头开始并添加新幻灯片或重新组织现有幻灯片。 无论是什么原因,只需几个简单的步骤即可快速完成。
在普通视图中添加,删除和重新排列幻灯片 (Adding, Deleting, and Rearranging Slides in Normal View)
First, we’ll be working in Normal View. This view is the default view that you’re probably used to working in—one big slide in front of you with the Slide Preview pane on the left-hand side.
首先,我们将在“普通视图”中工作。 该视图是您可能曾经使用过的默认视图-前面有一个大幻灯片,左侧的“幻灯片预览”窗格。
To add a new slide, Go to the “Slides” section of the “Home” tab. Here, you’ll have two choices for adding a new slide.
要添加新幻灯片,请转到“主页”选项卡的“幻灯片”部分。 在这里,您有两种选择来添加新幻灯片。
- Clicking the “New Slide” button will automatically insert the last used slide layout. Alternatively, you could press Ctrl+M. 单击“新幻灯片”按钮将自动插入上次使用的幻灯片布局。 或者,您可以按Ctrl + M。
- Clicking the arrow under the “New Slide” button opens a drop-down menu with several slide templates to choose from. 单击“新幻灯片”按钮下的箭头,将打开一个包含多个幻灯片模板的下拉菜单。

Let’s go ahead and bring down the menu and see what we have. Just choose the slide template that works best for what you want to do.
让我们继续前进,调低菜单,看看有什么。 只需选择最适合您想做的幻灯片模板即可。

To insert a slide between two already-existing slides, go to the Slide Preview pane and select the area between the two slides where you want to insert the new slide.
要将幻灯片插入到两个已经存在的幻灯片之间,请转到“幻灯片预览”窗格,然后在两个幻灯片之间选择要插入新幻灯片的区域。

Right-click and select “New Slide.”
右键单击并选择“新幻灯片”。
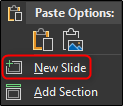
The slide template will be the same as the slide directly above where you’re inserting the new one.
幻灯片模板将与插入新模板的上方的幻灯片相同。
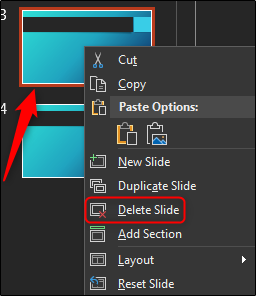
Deleting a slide is just as easy. In the Slide Preview pane, right-click the slide you want to delete and then click “Delete Slide.” Alternatively, you could select the desired slide to be deleted and press “delete” on your keyboard.
删除幻灯片同样简单。 在“幻灯片预览”窗格中,右键单击要删除的幻灯片,然后单击“删除幻灯片”。 或者,您可以选择要删除的幻灯片,然后按键盘上的“删除”。
Finally, to rearrange the order of the slides, click and drag the slide to the desired position.
最后,要重新排列幻灯片的顺序,请单击并将幻灯片拖到所需位置。
在幻灯片浏览器视图中工作 (Working in Slide Sorter View)
Now let’s learn how to add, delete, and rearrange our slides in PowerPoint’s Slide Sorter View.
现在,让我们学习如何在PowerPoint的幻灯片浏览器视图中添加,删除和重新排列幻灯片。
To switch over to Slide Sorter view, click the slide sorter icon on the status bar at the bottom-right of the screen.
要切换到幻灯片浏览器视图,请单击屏幕右下方状态栏上的幻灯片浏览器图标。
To add a new slide, select the slide that you want to insert a new slide in front of, right-click, and select “New Slide.”
要添加新幻灯片,请选择要在其前面插入新幻灯片的幻灯片,单击鼠标右键,然后选择“新建幻灯片”。
Similar to working in Normal view, you may also use the “New Slide” feature in the “Home” tab.
与在普通视图中工作类似,您也可以使用“主页”选项卡中的“新幻灯片”功能。
To delete a slide, select the slide you’d like to delete, right-click, and select “Delete Slide.”
要删除幻灯片,请选择您要删除的幻灯片,右键单击并选择“删除幻灯片”。

Finally, as with Normal view, to rearrange slides in Slide Sorter view, click and drag the slide to the desired position.
最后,与“普通”视图一样,要在“幻灯片浏览器”视图中重新排列幻灯片,请单击并将其拖动到所需位置。
Pretty simple, right?
很简单,对吧?
翻译自:
powerpoint预览
转载地址:http://kizwd.baihongyu.com/